Plants Don’t Die Suddenly. They Send Signals. You Just Need to Read Them.
When a plant starts yellowing, browning, drooping, or losing leaves, it’s not “just stress.”
Plants don’t collapse in 24 hours. They decline slowly — and visibly — long before death.
The problem?
Most beginners react too late, or worse, they “fix” the wrong thing:
- Adding more water to an overwatered plant
- Moving a low-light plant into harsh sun
- Fertilizing a plant with rotten roots
- Repotting into the wrong soil
This guide is the exact step-by-step process professionals use to revive dying indoor plants — simplified for beginners and adapted for Indian homes.
SUMMARY — What You Will Learn
In this complete plant-revival guide, you’ll learn:
- How to diagnose what’s killing your plant
- How to replace dead, compacted, or toxic soil
- How to reset your watering routine
- How to give a weakened plant the right nutrition
- When to trim, repot, or restart from cuttings
- Which Tarva products help revive stressed indoor plants
Let’s bring your plant back from the edge.
H2: Diagnosis First (Don’t Try to Fix Anything Until You Identify the Problem)
Most failed revival attempts happen because beginners try random fixes without knowing the cause.
Diagnosis comes first.
Action second.
Here’s exactly what to check:
1. Check the Soil Moisture
Stick your finger 2–3 inches into the soil.
- Wet + smelly? → Overwatering / root rot
- Dry + sandy? → Underwatering
- Hard like cement? → Compaction
If the soil is wrong, you must replace it completely.
2. Inspect the Roots
Gently slip the plant out of the pot.
Healthy roots:
White, firm, and spread evenly.
Unhealthy roots:
- Clumped in circles (root bound)
If roots are mushy → root rot.
If roots are circling → needs repotting.
If roots are dry and thin → underwatering.
3. Look at the Leaves
Leaves tell you the full story:
- Yellow leaves → Overwatering / poor soil
- Crispy edges → Underwatering / low humidity
- Droopy plant → Root damage
- Small new leaves → Low light
- Brown patches → Harsh sun
- White spots → Pests
- Sticky leaves → Sap-sucking insects
4. Check the Light Source
Is your plant:
- Getting direct harsh sun?
- Sitting in a dark corner?
Light is the most powerful factor in plant recovery.
5. Inspect for Pests
Check leaf undersides and soil surface.
Look for:
- Fungus gnats (tiny flies)
- Scale insects (round brown bumps)
If pests are present → clean and quarantine immediately.
Once you diagnose the core issue, the revival process becomes easy.
Now let’s fix it step by step.
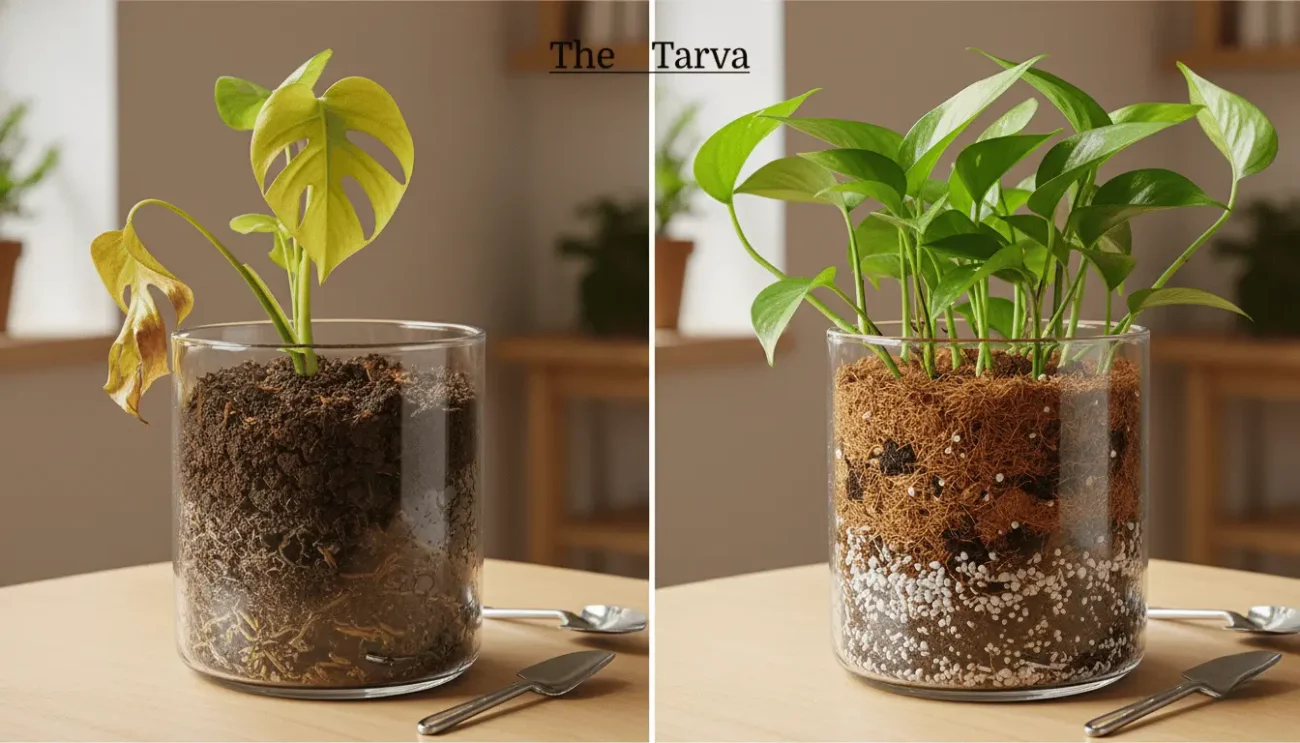
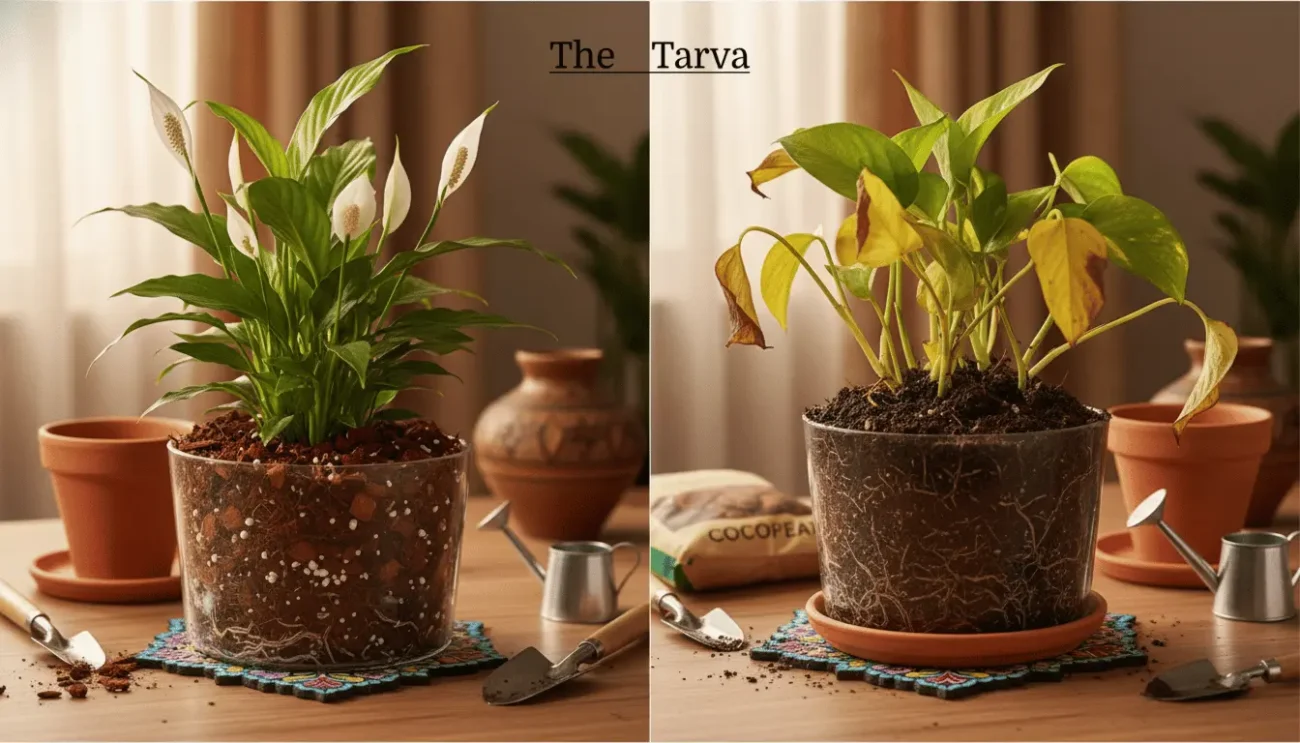
Soil Replacement (The Most Important Step in Revival)
If your plant is dying, assume the soil is part of the problem.
In 80% of cases, bad soil = dying plant.
Here’s the brutally honest truth:
If the soil is wrong, nothing else will save the plant — not fertilizer, not sunlight, not watering.
The soil MUST be changed.
Step-by-Step Soil Replacement Process
Step 1: Remove the Plant Carefully
Hold the stem base and gently lift or tap the pot’s bottom.
Step 2: Remove Old Soil Completely
Shake off old soil.
Wash roots under running water only if root rot is present.
Step 3: Trim Dead or Rotten Roots
Use scissors to cut:
Healthy roots must remain.
Step 4: Prepare Fresh Soil Mix
Use a breathable, airy, nutrient-rich mix:
Tarva Recommended Mix:
Perfect for almost all indoor plants in India.
Step 5: Repot Into a Clean Pot
Pot must have drainage.
Half-fill with Tarva mix → place plant → backfill gently.
Step 6: Do NOT Fertilize Immediately
Let the plant settle.
Fertilizing too soon burns stressed roots.
When You MUST Replace Soil
- Soil stays wet for days
- Soil smells sour
- Visible fungus
- Root rot
- Soil is hard + compact
- Soil contains mud/garden soil
- Plant hasn’t grown in 3+ months
If any of these match — replace the soil today.
Watering Reset (Stop the #1 Cause of Dying Indoor Plants)
Watering is where 95% of beginners go wrong.
You MUST reset your watering routine after diagnosis.
How to Water a Dying Plant Properly
If Overwatered:
- Do NOT water for 5–10 days
- Keep in bright, indirect light
- Add perlite when repotting
- Water only when top 2 inches are dry
If Underwatered:
- Give a deep soak until water drains
- Do not only mist the top layer
- Add cocopeat for moisture retention
- Water more frequently but deeply
If Root Rot Was Present:
- Water lightly for 2 weeks
If Soil Was Compacted:
- Water slowly so soil can absorb
- Improve aeration with chips + perlite
Watering Rule for All Indoor Plants:
Water only when the top 2–3 inches of soil feel dry. Not before.
This single habit will save 90% of dying plants.
Nutrient Boost (Only After the Plant Stabilizes)
A dying plant is like a sick human — you don’t give heavy food during recovery.
You stabilize first → feed later.
After 2–3 weeks of recovery, you must add nutrients to rebuild strength.
Best Nutrients for Reviving Indoor Plants
1. Vermicompost (Gentle, Safe, Organic)
Adds:
Dose:
- 2 tablespoons for small pots
- 4 tablespoons for medium pots
- 1 cup for large pots
2. Seaweed Extract (Root Recovery)
Promotes strong new roots.
Safe even for damaged plants.
3. Diluted Liquid Fertilizer (After 3–4 Weeks)
Use mild dilution.
Avoid chemical-heavy fertilizers.
DO NOT Fertilize:
- Immediately after repotting
- Plants with root rot
- Sick or heavily stressed plants
- During winter dormancy
Feed only when the plant starts showing new growth.
- Why Your Plant Is Dying – 10 Reasons
- How to Use Vermicompost for Indoor Plants
- Best Soil Mix for Indoor Plants in India
- How to Make the Perfect Potting Mix
- Tarva Indoor Plant Care Essentials
Revive Your Plant With the Tarva Revive Kit
The fastest way to revive a dying plant is to give it:
- Nutrient-rich vermicompost
- Microbes for root healing
- Neem protection against pests
This is exactly what the Tarva Revive Kit includes.
🌱 Tarva Revive Kit (SKU: T-RVK-01)
Contains:
Everything your dying plant needs in one bundle.
Shop the Tarva Revive Kit
FAQs
1. Can a dying plant be saved?
Yes — unless the roots are 100% rotten or the stem is fully mushy.
2. Should I repot a dying plant?
If soil is wrong or roots are damaged → yes.
If only leaves are stressed → not always.
3. How long does plant revival take?
Anywhere from 2–8 weeks depending on the damage.
4. Should I cut dying leaves?
Remove fully brown or yellow leaves. They drain energy.
5. Does sunlight help revival?
Bright indirect light = essential.
Direct sun = harmful for stressed plants.
6. Should I fertilize a stressed plant?
Not immediately. Wait 2–3 weeks after recovery.
7. Why is my plant not standing upright after reviving?
Roots need time to rebuild. Support with a stake for 1–2 weeks.