Root Rot Is the Silent Killer of Indoor Plants (But Completely Curable)
If your plant is drooping despite watering…
If the soil smells bad…
If the leaves are turning yellow or mushy…
You’re not dealing with a “watering mistake.” You’re dealing with something far more serious:
Root rot.
Root rot is the number one silent killer of indoor plants. It starts quietly in the soil long before the leaves show symptoms. By the time most plant parents notice the problem, the roots are already rotting underground.
The good news?
Root rot is 100% fixable if you act fast — and the recovery process is surprisingly simple when you follow the correct steps.
This guide will show you exactly how to diagnose, treat, and prevent root rot using professional, beginner-friendly methods tailored for Indian indoor plant conditions.
SUMMARY — What This Guide Covers
In this complete 2025 Tarva guide, you’ll learn:
✔ The early and late symptoms of root rot
✔ How to confirm rot without damaging roots
✔ A step-by-step treatment plan used by experts
✔ How to trim, disinfect, and revive damaged roots
✔ Soil replacement rules for full recovery
✔ Long-term prevention strategies
✔ CTA for Tarva Quick-Drain Mix (specifically formulated to prevent rot)
This is not a surface-level “tips” article — this is the full treatment protocol.
H2: Symptoms of Root Rot (What to Look For Before It’s Too Late)
Root rot starts in the soil, so the symptoms usually appear above the surface much later. However, early detection increases survival dramatically.
Below are the most reliable indicators.
1. Persistent Drooping (Even After Watering)
A plant that droops despite moist soil is almost always sending a distress signal. Healthy roots absorb water quickly, so drooping + wet soil = broken water uptake.
2. Yellowing Lower Leaves
When roots rot, lower leaves lose nutrients first. They gradually turn pale, then yellow, then drop.
If yellowing is spreading upward, the rot is worsening.
3. Mushy, Soft, or Translucent Stems
Overwatered stems feel soft when squeezed. This is a major red flag, especially in Peace Lilies, Pothos, ZZ Plants, and Money Plants.
4. Soil That Smells Sour or Rotten
Healthy soil smells earthy.
Rotten soil smells like sewage, sulfur, or fermented mud — a classic sign of anaerobic bacteria.
5. Fungus Gnats Hovering Over Soil
These tiny black flies thrive in overwatered environments. While annoying, they’re actually a helpful early indicator.
6. Soil Staying Wet for More Than 4–5 Days
Indoor plants should never sit in wet soil for long. If they do, the soil structure is poor and oxygen cannot reach the roots.
7. Brown or Black Roots (When Checked)
Healthy roots are:
- Firm
- White or cream-colored
- Have a fresh earthy smell
Rotten roots are:
- Brown or black
- Mushy
- Slimy
- Break apart easily
- Smell foul
Checking the roots gives you 100% certainty.
8. Stunted Growth or No New Leaves
Plants stall growth when roots cannot absorb nutrients. This is a slow but reliable sign.
Early Detection Tip:
If you catch root rot before the stems turn mushy, the plant has a very high chance of survival.
H2: Step-by-Step Treatment – How to Fix Root Rot Completely
Root rot cannot be fixed by “watering less.” It needs an intervention.
Below is the exact protocol used by professional growers worldwide.
STEP 1 — Remove the Plant from the Pot Gently
Hold the base of the stem and slowly lift the plant out.
Tap the pot’s bottom if needed.
Avoid pulling harshly — damaged roots tear easily.
STEP 2 — Remove All Old Soil
Use your fingers to loosen all soil around the root ball.
Remove every chunk you can. Additionally, if the soil is muddy or smells bad, rinse the roots under running water to expose the damage clearly.
This part is crucial.
Rotten soil contains harmful bacteria that will reinfect the plant if reused.
STEP 3 — Trim Rotten Roots
Using clean scissors:
✔ Cut off:
- Black roots
- Mushy roots
- Smelly roots
- Soft sections
✔ Keep only:
- White roots
- Firm roots
- Crisp and healthy-looking ones
Be brutal here.
Leaving even a small rotten root can restart the infection.
After trimming, disinfect scissors with rubbing alcohol.
STEP 4 — Disinfect the Root System
You have two safe options:
Option 1: Hydrogen Peroxide Dip (Best for Severe Rot)
Mix 1 part 3% hydrogen peroxide with 2 parts water.
Dip the roots for 2–3 minutes.
This kills harmful fungi and oxygenates the roots.
Option 2: Cinnamon Powder (Natural Anti-fungal)
Dust the trimmed root system with cinnamon.
It’s antifungal and gentle.
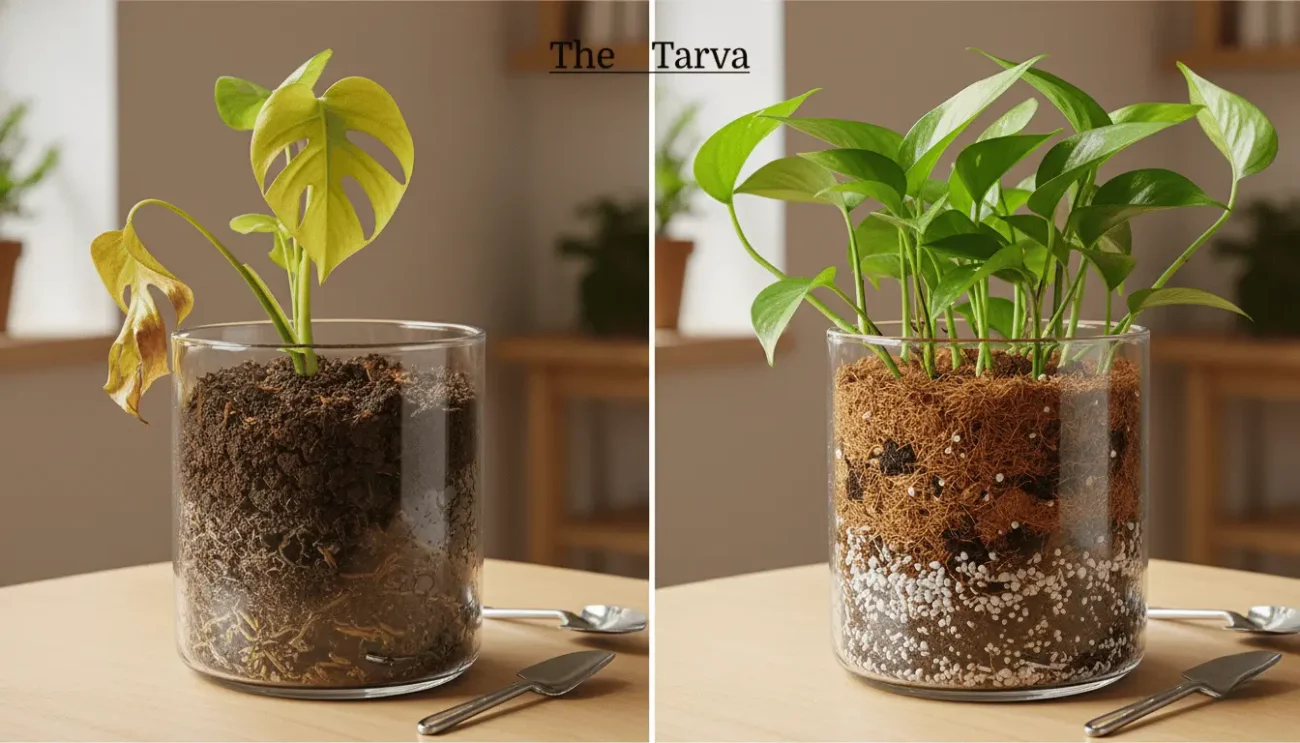
STEP 5 — Prepare Fresh, Fast-Draining Soil
This is the MOST important part of root rot recovery.
Slow-draining soil = guaranteed re-infection.
Your plant MUST go into an airy mix.
Tarva Recommended Root-Rot Recovery Mix:
- 40% Coco Chips
- 30% Cocopeat
- 20% Perlite
- 10% Vermicompost (for gentle nutrients)
However, for best results, use:
🌱 Tarva Quick-Drain Mix
Designed specifically to:
- Maximize airflow
- Prevent excess moisture
- Stop rot from returning
- Support faster root development
This mix drastically increases survival rate.
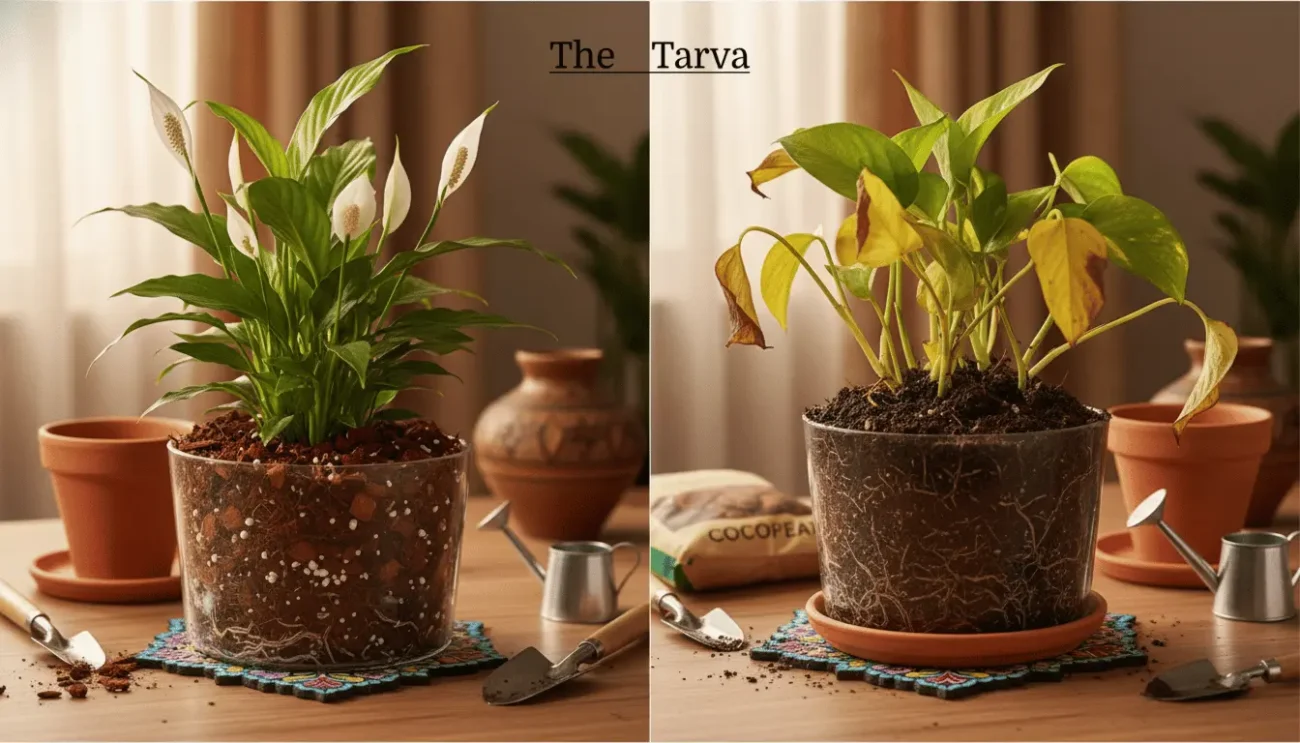
STEP 6 — Repot the Plant into a Clean Pot
Disinfect the pot with soap or peroxide.
Add fresh soil only — never reuse the old mix.
Place the plant slightly higher than before to improve drying.
STEP 7 — Do NOT Water Immediately
Most people make this mistake.
After root rot treatment, watering immediately suffocates the recovering roots.
Instead:
- Wait 24–36 hours before watering
- Let tiny root wounds dry and seal
This small delay greatly increases success.
STEP 8 — Water LIGHTLY (Only Once at First)
After the 24–36 hour wait, water lightly until soil is just moist — not soaked.
Do not water again until the top 2–3 inches feel dry.
STEP 9 — Increase Light Immediately
Roots recover faster in bright, indirect light.
Place the plant:
- Near a window (but avoid direct hot sun)
- Where air movement is natural
- Away from AC drafts
More light = stronger recovery.
STEP 10 — Add Root Stimulators (Optional but Highly Effective)
After 10–12 days, begin using:
✔ Seaweed extract
Improves root development and reduces shock.
✔ Diluted vermicompost tea
Adds gentle nutrients without burning recovering roots.
Avoid heavy fertilizers for 3–4 weeks.
H2: Prevention Tips – How to Ensure Root Rot Never Returns
Fixing root rot is great — preventing it is even better. Fortunately, a few simple habits can protect your plant permanently.
1. Always Use Fast-Draining Soil
Dense soil traps water.
Chunky, airy soil keeps roots breathing.
Choose mixes with:
- Coco chips
- Perlite
- Cocopeat
- Bark
This creates air pockets that roots need to survive.
👉 Internal Link: Best Potting Mix for Indoor Plants → (add URL)
2. Stop Watering on Schedule
Plants don’t care about your calendar.
They care about soil moisture.
Always check the top 2 inches before watering.
3. Select the Correct Pot Size
Oversized pots hold water too long.
Always size up by only 1–2 inches.
4. Ensure Proper Light
Low light = slow evaporation = high risk of rot.
Place plants near windows, balconies with light, or bright indoor corners.
5. Improve Air Circulation
Stagnant air encourages fungal growth.
Fans, open windows, and spacing plants apart helps.
6. Use Terracotta Pots for Heavy Drinkers
Terracotta breathes better than plastic.
Great for plants prone to rot.
7. Feed Wisely
Healthy roots resist pathogens better.
Use:
- Vermicompost monthly
- Seaweed extract biweekly
- Dolomite lime (if soil becomes too acidic)
8. Remove Catch Plates (or Empty Them Often)
Sitting water at the bottom = instant rot.
Always empty plates within 10 minutes.
9. Repot Every 12–18 Months
Old soil compresses and suffocates roots.
Fresh soil = fresh oxygen.
10. Use Tarva Quick-Drain Mix for All Sensitive Plants
Plants like Peace Lily, ZZ Plant, Snake Plant, Philodendron, Pothos, and Alocasia all thrive with better drainage.
Tarva Quick-Drain Mix keeps moisture balanced so roots never drown.
Internal Links (Add URLs When Uploading)
- How to Use Vermicompost for Indoor Plants
- Best Soil Mix for Indoor Plants in India
- Why Your Plant Is Dying – 10 Reasons
- How to Revive a Dying Indoor Plant
- Tarva Plant Care Essentials
CTA — Save Your Plant with Tarva Quick-Drain Mix
If you want to fix root rot fast and prevent it permanently, switch to a soil designed to keep roots healthy.
🌱 Tarva Quick-Drain Mix (SKU: T-QDM-01)
Perfect for:
- Rot-prone plants
- Overwaterers
- Humid homes
- Low-light rooms
- All indoor tropical plants
This mix creates the ideal balance of air + moisture, making root rot almost impossible.
👉 Shop Tarva Quick-Drain Mix → (insert link)
FAQs (SEO Optimized)
1. Can a plant recover from root rot?
Yes — if at least 20–30% healthy roots remain.
2. How long does recovery take?
Most plants recover in 2–8 weeks depending on severity.
3. Should I cut yellow leaves caused by root rot?
Remove fully yellow leaves. Leave partially yellow ones until new growth appears.
4. Can root rot spread to other plants?
Not directly. However, fungus gnats and contaminated soil can carry issues.
5. Should I fertilize a plant recovering from root rot?
No. Avoid heavy fertilizers for 3–4 weeks.
6. Does hydrogen peroxide kill root rot?
It helps, but only when combined with soil replacement and proper drainage.
7. What’s the best soil to prevent root rot?
A fast-draining mix like Tarva Quick-Drain is ideal.